In part 1 of my Email Authentication blog series, I discussed Sender Policy Framework (SPF) in more detail. In this post, which is part 2 of the series, I will explain the next element in the authentication framework, which is DKIM.
What is DKIM (DomainKeys Identified Mail)?
One of the most important tasks for an email sender is to protect the email address that the recipient sees when receiving an email. This is called the domain address and it is usually susceptible to spoofing by fraudsters looking to trick the recipient into believing that the email is from a legitimate source.
DKIM is a technology that combats this phishing technique by proving that the mailserver the email claims to have been sent from, is indeed the server that sent the email.
DKIM is used to protect the ‘from’ email address seen by the recipient, by allowing the receiving mailserver to check that an email claiming to come from a domain is authorized by the owner of that domain. This is done via cryptographic authentication. If the check fails, meaning the sending server is NOT authorized to send from this domain address, then the email can be rejected by the receiving mailserver.
Like SPF, DKIM is an open standard and available for all to implement at no charge.
Free email services like Yahoo and Gmail use DKIM to authenticate the validity of emails coming into their mailservers.
How DKIM works:
In order to understand how DKIM works – there are a couple of concepts that need an explanation:
Digitally signs: Digital signatures are a standard element of most cryptographic protocols and are commonly used for detecting forgery or tampering. They contain a key set (public and private keys) that are used to create and decipher checksums to determine if the digital signature is valid or if it has been tampered with.
Key set: Digital signature technologies use a public key and private key which make up a full key set. A private key is kept secret and used to create a checksum on the original document/email. Only the sender has access to this key. A public key is shared (on a DNS server) and used by the recipient to decode the checksum created using the private key.
Checksum: A checksum is a piece of data used for the purpose of detecting errors which may have been introduced during message transmission or storage. In the case of digital signatures, only the correct public key will be able to decode the checksum created by the private key. If the decoding of the checksum passes, it is confirmation that the digital signature is valid.
Putting all these elements together in the context of DKIM
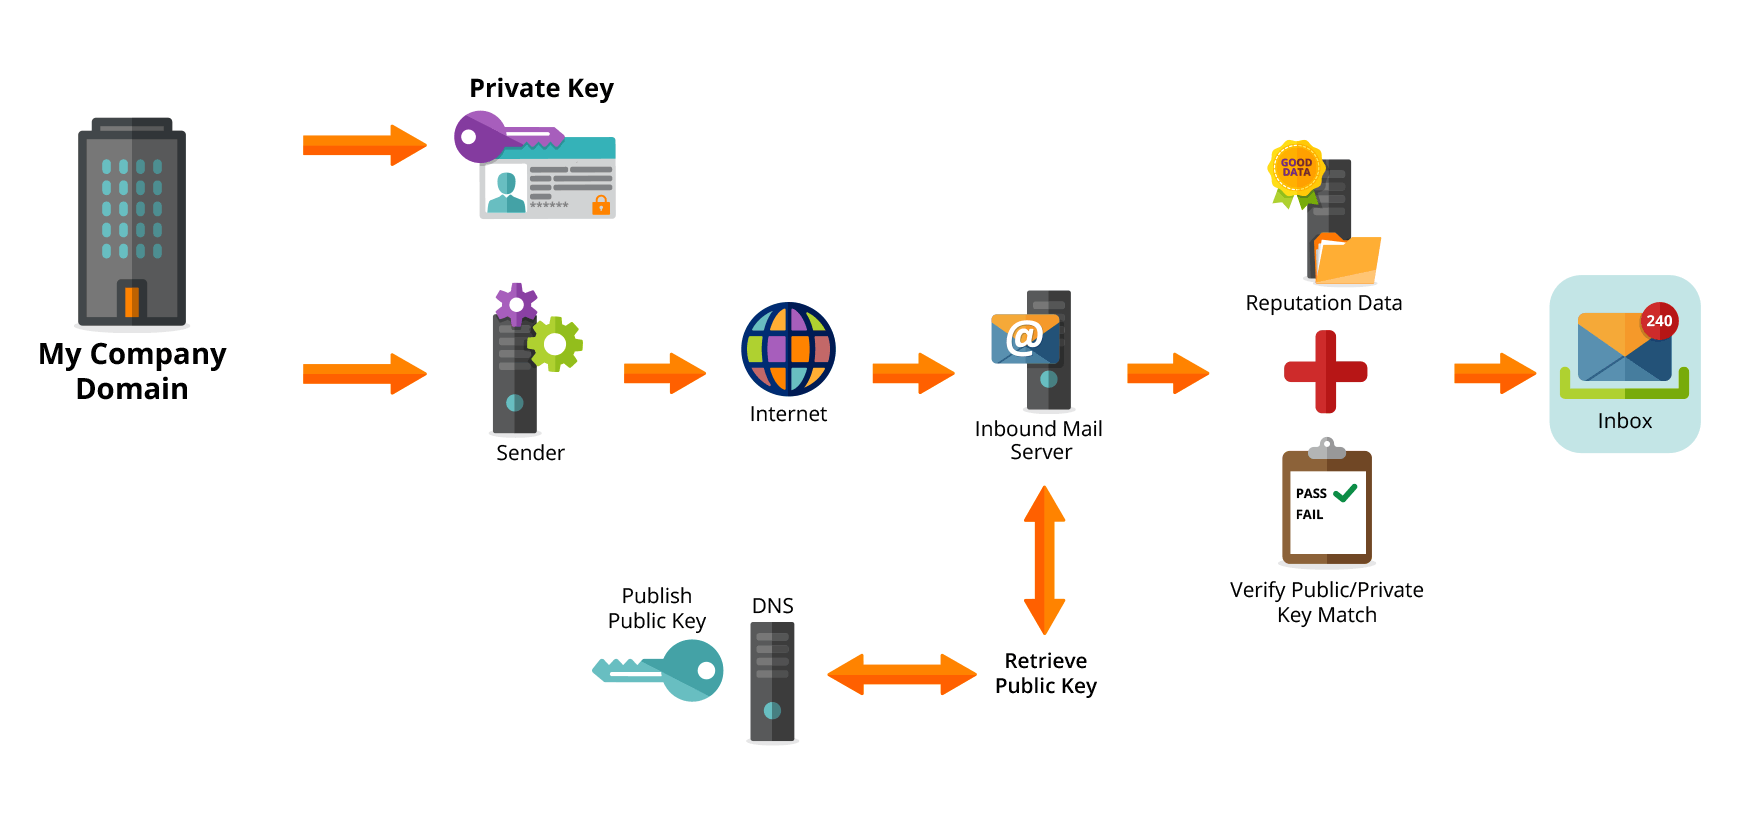
The sending domain of the email digitally signs the message content and some parts of the message headers using its private key to create a checksum. The associated public key is published in the DNS records.
On receiving the email, the receiving domain retrieves the public key information from the DNS and uses it to decode the checksum in the email. If the checksum passes, it proves that the message was sent from the domain it claims to come from.
A real world example:
Joe works at My Company. My Company is a well known brand and is often targeted by phishing attacks. My Company’s domain administrator decides to implement DKIM.
- He generates a key set (public key and private key) for the My Company domain.
- He then adds the public key to the My Company DNS for recipient mailservers to access.
- He enables digital signing of outgoing emails from the My Company mailservers using the private key.

Joe decides to send an email to Mike:
- As his email leaves the My Company mailserver, it is digitally signed (using the checksum it generated for this specific email) with its private key.
- Mike’s mailserver receives the email and retrieves the public key from the My Company’s DNS record.
- Using the checksum and the public key, Mike’s mailserver verifies that the DKIM signature is valid.
- Mike’s mailserver delivers the email to Mike’s mailbox.
A phisher tries to send Mike an email, pretending to be from [email protected]

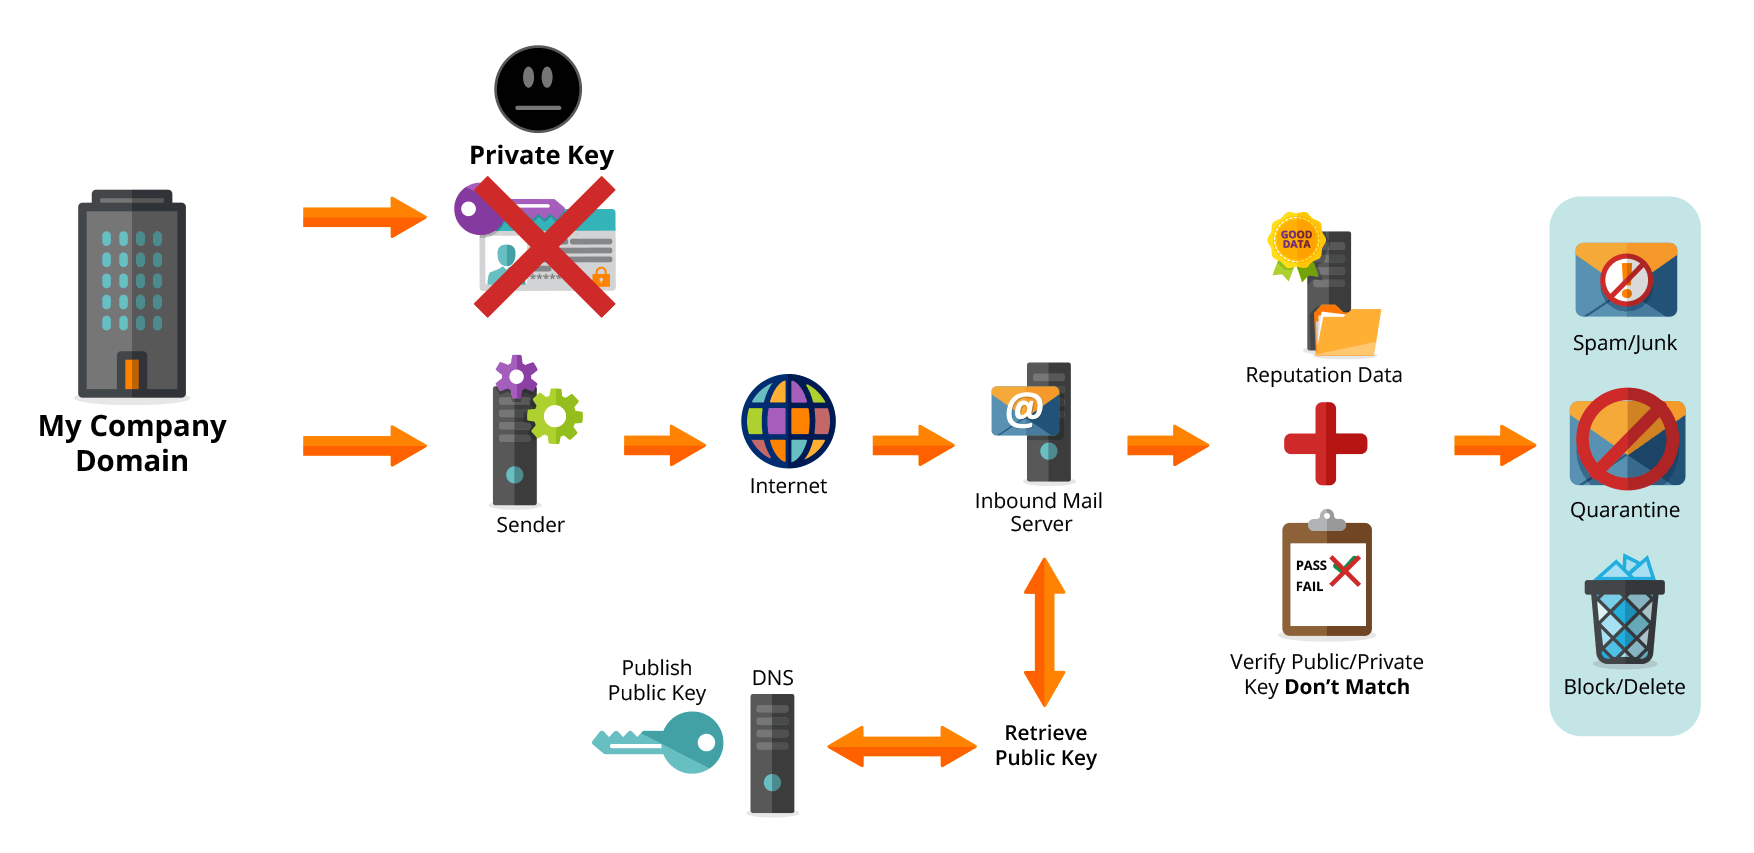
- The Phishing mailserver cannot digitally sign the email with a known DKIM key. The email is sent without DKIM enabled.
- Mike’s mailserver receives the phishers email.
- Because the email is not signed using DKIM, Mike’s mailserver can apply certain rules such as: mark as spam, quarantine or reject.
Note: When DMARC (the subject of my next post) is implemented the recipient mailserver can fail incoming messages that do not have DKIM or fail to decode the checksum correctly.
How to implement DKIM:
- If you are a domain owner, make sure that you create your key set.
- Enable DKIM signing on all mailservers (might require a third party plugin)
- Share your private key with all vendors/service providers that send email on your behalf (You can create multiple key sets for a specific domain or even subdomains i.e. emails.Mycompany.com)
- Enable your servers to check for DKIM on all inbound emails
- Receiving mailserver owners need to enable their servers to check for DKIM on all inbound emails and apply rules to manage failures.
- If you are Joe or Mike, speak to your domain owner to ensure that this is in place.
DKIM does however have a weakness: The domain that holds the public key is not always associated with the ‘from address’ seen by recipients. The validation process can use another address found in the headers as the name component instead of the visible email address. This means that phishers could send an email that passes DKIM, because they are sending from their own domains ( i.e. [email protected]) and using this to DKIM sign the email. To combat this, DMARC combines SPF and DKIM to enforce stringent alignment and ensure that the ‘from address’ seen by recipients is protected.
In my next post I will explain how DMARC combines SPF and DKIM to close the loop on your email authentication needs.
For more information on DKIM visit: http://dkim.org/


